This is a pictorial demonstration on how to blow out eggs with
the Blas Fix Egg blower.
You could choose to blow them out the hard way, but be careful, I almost
passed out the last time I tried that. The pictures show a finished Pysanky
from our on-line class, but the same
process could be used on fresh white eggs, if you choose to work with blown
eggs. Be warned, please read our tips
on how to choose good eggs. Weak or cracked eggs won't handle
the pressure and will end up wasted in the bottom of the disposal. You
can expect 40% to 50% fallout on grocery store purchased eggs, so
pick out the good ones and save the rest for breakfast.
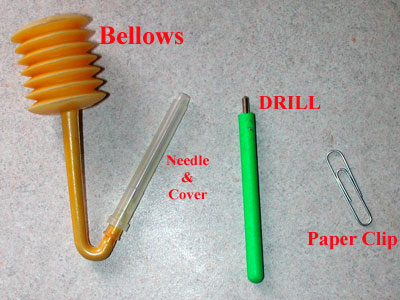
FIGURE 1
MATERIALS NEEDED
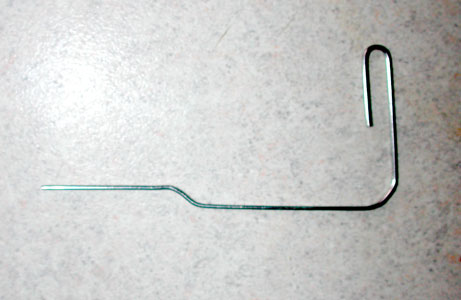
You need basically 2 items, the BLAS-FIX
egg blower and a common paper clip. The Blas-Fix kit consists
of a plastic bellows, needle with cover and a small hand drill. Also,
you will need the kitchen sink, so wash your dishes.
FIGURE 2
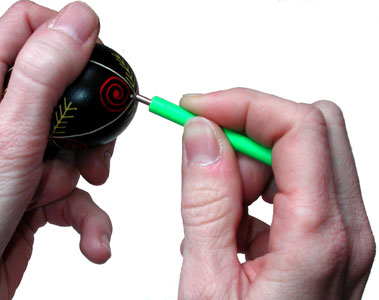
STEP 1 POSITION THE DRILL
Grasp the hand drill in your hand so that the end of the handle is braced
against the inside of your finger or the palm of your hand. Touch the metal
tip at the intersection on what you choose as the bottom of the egg. If
you are making a hanging ornament, then make the hole on the top of the
egg.
FIGURE 3
FIGURE 4
STEP 2 TWIST THE DRILL
Apply firm pressure and twist the drill forward and back. Too much pressure
will risk cracking the egg, too little and it will take longer to drill
the hole. Until you get the hang of this, error on the side of patience
and take your time. The drill slowly scrapes a hole in the shell (See FIGURE
3). Be extremely careful when finally breaking through (FIGURE 4).
If you push too hard, the handle has been known to continue on into the
shell, making a slightly larger hole than expected.
FIGURE 5
FIGURE 6
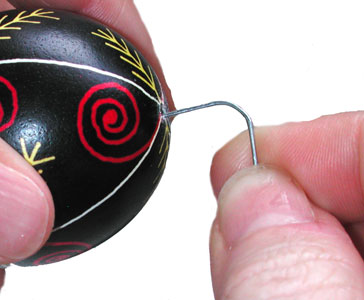
STEP 3 SCRAMBLE THE YOLK
If you have one of those retro In the Egg Scramblers, you might try it
here. Otherwise, unfold the paperclip (SEE FIGURE 5) and insert it into
the hole you made. Move it up and down, side to side, twirl it to
break up the yolk sack in the egg. I also cover the hole with my thumb
and shake the egg vigorously. If you don't sufficiently break
up the yolk, the sack will clog the hole resulting in a broken egg.
FIGURE 7
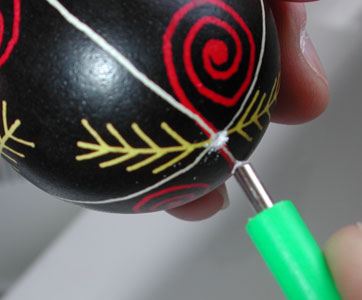
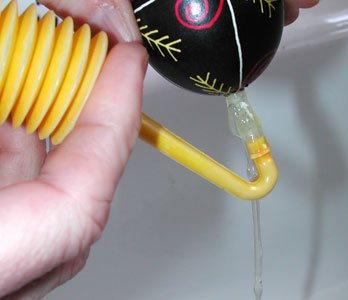
STEP 4 BLOW OUT THE EGG
Remove the cover from the needle.Position the egg and insert the
needle as shown in FIGURE 7. Place your thumb over the hole on the bellows
and slowly pump air into the egg. The liquid inside the egg falls to the
bottom of the shell above the hole. Air pumped inside the egg pushes the
liquid down through the hole. Don't put the base of the needle against
the shell, leave room for the liquid to flow out. If you encounter something
blocking the hole, withdraw the needle and scramble the yolk a little more.
Sometimes if you can get the egg sack partially protruding from the hole,
it might be possible to just grab it with your fingers and pull it out.
If the shell is week or a crack exists, here is where the egg will break.
FIGURE 8
FIGURE 9
FIGURE 10
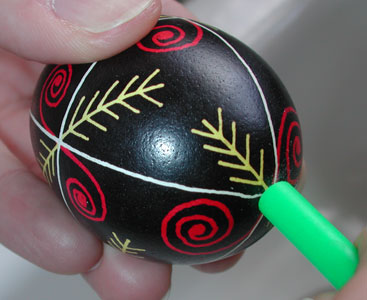
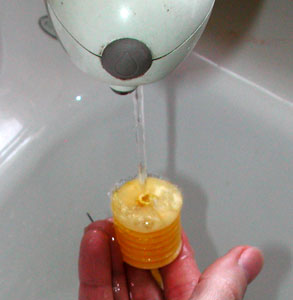
STEP 5 RINSE OUT THE SHELL
Even if you completely empty out the egg matter from the shell in step
4, residue will still remain. Residue that will stink and drip stinky goo
on your display shelf. To prevent this, the egg needs to be completely
rinsed and dried. The Blas Fix has a hole in the bellows. Fill it with
water from your faucet (FIGURE 8). Cover the hole on the bellows with your
finger, placing the needle inside the shell and squirt the water all around
(FIGURE 9). Then withdraw the needle, cover the hole on the egg and shake
it like a can of spray paint. Then using the egg blower, repeat step 4
and blow out the rinse. Repeat this as many times as it takes until the
liquid coming out is clear. Then, place the egg with the hole
side down in a ring
stand on top of several layers of tissue (FIGURE 10). Let it
drain and replace the tissue the following day. If it remains dry, then
the egg is ready for use or a coat of polyurethane.
YouTube Video on how to use the egg blower. The entire video is about
7 minutes. If you move to 1 minute and 25 seconds, you will jump
to the point in the episode where the demonstration begins. However,
you might just enjoy watching the entire video.