FIGURE 31 |
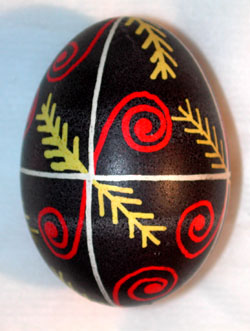
STEP 15 FINAL COLOR
This is your final color. This color will be the background
for all of the designs drawn We choose the all covering black
(FIGURE 31). Some of the completed lines are showing through the wax, but
are sealed and will not be affected by the dye in this step. This will
be your longest duration in the dye, averaging about 10 minutes or more.
Make sure all of the previous color has been covered. Other popular
last colors are dark red, purple or royal blue. Let this dry very well
before the next step. If you can give it 30 minutes or longer, all the
better.
|
|

FIGURE 32 |

FIGURE 33 |

FIGURE 34 |

FIGURE 35 |

FIGURE 36 |
|
STEP 16 REMOVE THE WAX FROM PYSANKY
This is the most enjoyable part of the process. All the work will now be
revealed in glory if you executed your design well. Before you start,
there are a few decisions to be made. If you are sticking to tradition,
not blowing out your egg, this is the last step. Another option is to go
ahead and blow out your egg prior to removing the wax. The reason being
that if you splatter some egg or water on the egg at this step, it can
be rinsed off, the hole plugged and then put back into the final dye again.
However, if you are doing a class with a large group, that method gets
to be a little problematic. For this class, we are going to use the candle
to melt off the wax. There are other methods that will be explored later
on the site. First tear off about 3 feet of tissue paper and wrap it into
a small pad (similar to how you would normally do this function with toilet
paper). Then in your other hand hold the egg as in FIGURE 32. You
want to use the middle part of the flame. Too high will cause your egg
to turn black with soot. Too low and you will scrape the wick and pick
up wax from the candle. Choose a place on the egg that has wax applied
and pass it slowly through the flame (FIGURE 33). Always keep it moving.
Pausing in the flame will cook the contents near the shell, building pressure
inside the egg, forcing liquid out through the pores. You can tell its
hot enough by quickly examining the wax. It will begin to liquefy and glisten
(FIGURE -34). When you see this, quickly wipe the molten wax from the egg
with the tissue to reveal the artwork beneath (FIGURE 35). Move to another
part of the egg and repeat the process. Better to spread out the heating
of the egg as opposed to concentrating the heat on one side of the egg.
You will be finished when all of the wax is removed from the egg
(FIGURE 36). |
 |
STEP 17 BLOW OUT THE EGG
Most commercial eggs from grocery stores have thin shells.
If you want to allow the inside to dry out , place the egg in a safe place
where it won't get broken and if it explodes, it won't stink you out of
the house. It will take months and months to dry out, depending on the
temperature. Rotate it every few weeks. We recommend blowing
out the egg using our Aunt Marge's Egg Blower
|
|

|
STEP 18 VARNISH YOUR PYSANKY
Last and final step. In Ukraine, the artist would typically just
rub some linseed oil onto the shell to protect the dyes from moisture.
However, modern day oil based Polyurethane produces a remarkable
sheen and strengthens the shell. CLICK
HERE to see our method for varnishing your Pysanky
|
|